บทความโดย: Thai Windows Administrator Blog
Windows Virtual PC เป็นฟีเจอร์ทางด้านเวอร์ชวลไลเซชัน สำหรับทำการจำลองระบบคอมพิวเตอร์บน Windows 7 เป็นฟีเจอร์ที่จะช่วยให้ผู้ใช้สามารถทำการรันแอพพลิเคชันบางตัว ที่ไม่คอมแพตติเบิลกับ Windows 7 ในสภาพแวดล้อมของระบบปฏิบัติการวินโดวส์เวอร์ชันก่อนหน้าได้
วันที่ 4 สิงหาคม ที่ผ่านมา ไมโครซอฟท์ได้เปิดให้ผู้ที่สนใจดาวน์โหลด Windows Virtual PC RC (Release Candidate) ไปทดลองใช้งาน โดยดาวน์โหลดได้ฟรีจากเว็บไซต์ Windows Virtual PC
System Requirements ของ Windows Virtual PC
เฉพาะ Windows Virtual PC มีความต้องการระบบขั้นต่ำดังนี้
• CPU: ความเร็ว 1 GHz 32-bit หรือ 64-bit ซีพียู รองรับเทคโนโลยี Virtualization Intel-VT หรือ AMD-V
• Memory: ไมโครซอฟท์แนะนำให้ใช้หน่วยความจำ 2 GB หรือมากกว่า
• Disk space: พื้นที่ฮาร์ดดิสก์อย่างต่ำ 15 GB ต่อเวอร์ชวลแมชชีนแต่ละตัว
Support Host Operating Systems
Windows Virtual PC สามารถรองรับ Host Operating Systems ดังนี้
• Windows 7 Home Basic
• Windows 7 Home Premium
• Windows 7 Enterprise
• Windows 7 Professional
• Windows 7 Ultimate
หมายเหตุ: สำหรับ Windows XP Mode นั้นจะมีเฉพาะใน Windows 7 Enterprise, Windows 7 Professional และ Windows 7 Ultimate เท่านั้น
Support Guest Operating Systems
Windows Virtual PC สามารถรองรับ Guest Operating Systems ดังนี้
• Windows XP:
ฟีเจอร์ Virtual Applications นั้นจะมีให้ใช้งานบน Windows XP Service Pack 3 (SP3) Professional เท่านั้น
• Windows Vista:
ฟีเจอร์ Virtual Applications นั้นจะมีให้ใช้งานบน Windows Vista Enterprise และ Windows Vista Ultimate เท่านั้น
• Windows 7:
ฟีเจอร์ Virtual Applications นั้นจะมีให้ใช้งานบน Windows 7 Enterprise และ Windows 7 Ultimate เท่านั้น
ลงมือติดตั้ง Windows Virtual PC มีขั้นตอนดังนี้
ในการทดสอบติดตั้ง Windows Virtual PC ครั้งนี้ เป็นการติดตั้งเวอร์ชัน RC 32 bit บน Windows 7 Ultimate (RTM, 32 bit) บนเครื่องคอมพิวเตอร์ยี่ห้อ Dell รุ่น Optiplex 740 ใช้ซีพียู AMD Athlon X2 5600+ 2.9 GHz, RAM 2GB, Hard Disk 250 GB แบ่งออกเป็น 2 พาร์ติชัน ติดตั้งวินโดวส์ในพาร์ติชันที่ 1 ซึ่งฟอร์แมตพาร์ติชันเป็น NTFS โดยขั้นตอนการติดตั้งมีดังนี้
หมายเหตุ: ก่อนกำเนินการติดตั้ง ให้ทำการดาวน์โหลดโปรแกรม Windows Virtual PC RC ให้เสร็จเรียบร้อยก่อน
1. ในโฟลเดอร์ที่ใช้เก็บไฟล์โปรแกรม Windows Virtual PC RC ให้ดับเบิลคลิกที่ไฟล์ Windows6.1-KB958559-x86.msu
2. ในหน้าไดอะล็อกบ็อกซ์ Windows Update Standalone Installer ให้คลิก Yes เพื่อติดตั้งอัพเดท

Update for Windows (KB958559)
3. ในหน้าไดอะล็อกบ็อกซ์ Read these license terms (1 of 1) ให้คลิก I Accept เพื่อยอมรับข้อตกลง

License Terms
4. ในหน้าไดอะล็อกบ็อกซ์ The updates are being installed ให้รอจนการติดตั้งอัพเดทแล้วเสร็จ

Installing Update
5. ในหน้าไดอะล็อกบ็อกซ์ Installation complete ให้คลิก Restart Now เพื่อให้การติดตั้งเสร็จสมบูรณ์ ในกรณีที่ไม่สะดวกที่จะทำการรีสตาร์ท ให้คลิก Close เพื่อทำการรีสตาร์ทในภายหลัง

Installation complete
หมายเลขเวอร์ชันของ Windows Virtual PC RC
หมายเลขเวอร์ชันของ Windows Virtual PC RC คือ 6.1.7234.0
การเรียกใช้งาน Windows Virtual PC RC
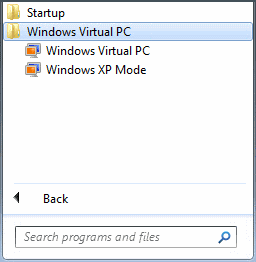
การเรียกใช้งาน Windows Virtual PC (RC) ทำได้โดยการคลิก Start คลิก All Programs แล้วคลิกโฟลเดอร์ Windows Virtual PC จากนั้นคลิก Windows Virtual PC ดังรูปด้านล่าง

หมายเหตุ: อาจจะทำการสร้างชอร์ตคัทเก็บไว้บนเดสก์ท็อปเพื่อเพิ่มความสะดวกในการใช้งาน
ขั้นตอนต่อไป
• Install Windows XP Mode RC
แหล่งข้อมูลอ้างอิง
• Windows Virtual PC System Requirement
• Windows Virtual PC Evaluation Guide
© 2009 TWAB. All Rights Reserved.


0 Comment:
Post a Comment