
การใช้งาน Windows SteadyState
หลังจากทพดารติดตั้ง Windows SteadyState เสร็จเรียบร้อยแล้วนั้น การใช้งานนั้นจะมี 5 ขั้นตอนด้วยกัน
1. Creating User Account and Configuring User Settings
2. Config Computer Restriction
3. Schedule Importance Updates
4. Protect the Hard Disk
5. Export User Profile
เริ่มต้นใช้งาน
การใช้งานโปรแกรม Windows SteadyState นั้น อาจเรียกจากไอคอนบนเดสก์ท็อป หรือจากเมนูโปรแกรม ซึ่งหน้าโปรแกรมของ Windows SteadyState จะเป็นดังรูปที่ 1
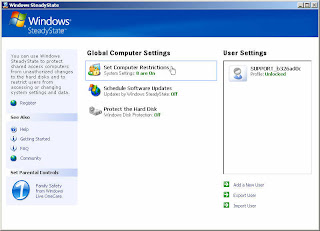
รูปที่ 1. Windows SteadyState
1. Create User Account and Configuring User Settings
การใช้งานขั้นตอนแรกนั้นคือการสร้าง User โดยมีวิธีการสร้างดังนี้
1. จากหน้าต่าง รูปที่ 1 Windows SteadyState ให้คลิกที่ Add a New User
2. ในหน้า Add a New User ให้ใส่ Username, Password และ User Location (คือตำแหน่งที่จะเก็บ profile ของยูสเซอร์ เช่น My Documents) เสร็จแล้วคลิก Ok
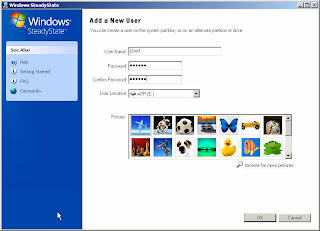
รูปที่ 2 Add a New User
3. ในหน้า User Settings ที่แท็บ General ซึ่งจะเป็นการตั้งค่าทั่วๆ ไป ดังรูปที่ 3
Genaral Settings
- Lock profile to prevent the user making permanent changes คือ ป้องกันไม่ให้ยูสเซอร์ทำการเปลี่ยนแปลง Profile
Session Timer
- Log off after n minutes of use ให้ทำการล็อกออฟยูสเซอร์หลังจากใช้งานนาน n ชั่วโมง
- Log off after n minutes idle ให้ทำการล็อกออฟยูสเซอร์เมื่อไม่มีการใช้งานนาน n ชั่วโมง
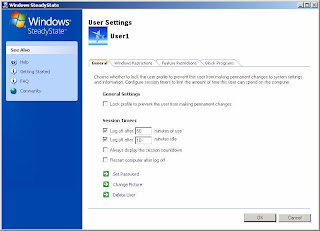
รูปที่ 3 Genaral User Settings
4. ในแท็บ Windows Resrictions ให้เลือก Select a restriction level for Windows ตามความต้องการ มี 5 ระดับ คือ High Restriction, Medium Restriction, Low Restriction, No Restriction และ Custome Restriction หากต้องการซ่อนไดรฟ์ไม่ให้ยูสเซอร์เข้าใช้งานได้นั้น ให้เลือกคอนฟิกได้จากส่วน Hide drive
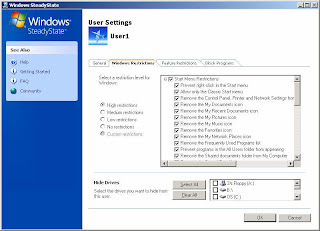
รูปที่ 4. Windows Resrictions
5. ในแท็บ Features Resrictions ให้เลือก Select a restriction level that applies to Microsoft Windows XP Program ตามความต้องการ มี 5 ระดับ คือ High Restriction, Medium Restriction, Low Restriction, No Restriction และ Custome Restriction และสามารถกำหนด โฮมเพจให้กับยูสเซอร์ได้โดยการพิมพ์ชื่อเว็บเพจในช่องใต้ Home Page ในกรณที่เลือก Prevent Internet access (Except Web sites below)
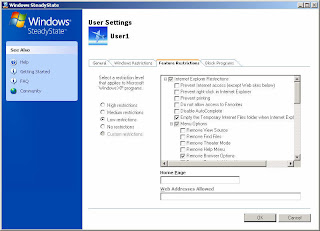
รูปที่ 5. Features Resrictions
6. ในแท็บ Block Program ให้เลือกรายชื่อโปรแกรมที่ต้องการบล็อกจากรายการใน Program Name ด้านซ้ายมือ แล้วคลิก Block เสร็จแล้วคลิก OK
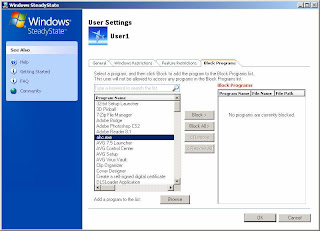
รูปที่ 6. Block Program
2.Configuring Computer Restriction
การใช้งานขั้นตอนที่สองคือการคอนฟิก Computer Restriction โดยมีวิธีการสร้างดังนี้
1. ในหน้าแรกของโปรแกรม Windows SteadyState ให้คลิกที่ set Computer Restriction ดังรูปที่ 7

รูปที่ 7. set Computer Restriction
2. ในหน้า set Computer Restriction ให้เลือกคอนฟิกค่า Privacy settings, Security settings และ Other settings ตามความต้องการ ดังรูปที่ 8 เสร็จแล้วคลิก OK
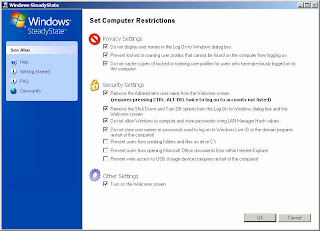
รูปที่ 8. Computer Restriction
3.Schedule Software Updates
การใช้งานขั้นตอนที่สามคือการคอนฟิก Schedule Software Updates โดยมีวิธีการสร้างดังนี้
1. ในหน้าแรกของโปรแกรม Windows SteadyState ให้คลิกที่ Schedule Software Updates ดังรูปที่ 9

รูปที่ 9. Schedule Software Updates
2. ทำการคอนฟิกวิธีการอัพเดท โดยเลือกแบบ Schedule Updates หรือ Select Updates ดังรูปที่ 10 เสร็จแล้วคลิก OK
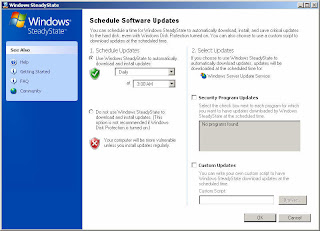
รูปที่ 10. Software Updates
4.Protect the Hard Disk
การใช้งานขั้นตอนที่สี่คือการคอนฟิก Protect the Hard Disk โดยมีวิธีการสร้างดังนี้
1. ในหน้าแรกของโปรแกรม Windows SteadyState ให้คลิกที่ Protect the Hard Disk ดังรูปที่ 11

รูปที่ 11. Protecting the Hard Disk
2. ในหน้า Protect the Hard Disk หากต้องการเปิดใช้งาน Protecting the Hard Disk ให้เลือก On แล้วเลือกวิธีการ protect ว่าจะเป็นแบบ Remove all changes at restart (จะทำการยกเลิกการเปลี่ยนแปลงทั้งหมดเมื่อทำการรีสตาร์ทเครื่อง) หรือ Retain changes temporarily (จะทำการยกเลิกการเปลี่ยนแปลงทั้งหมดในวันและเวลาที่กำหนด) เสร็จแล้วคลิก OK
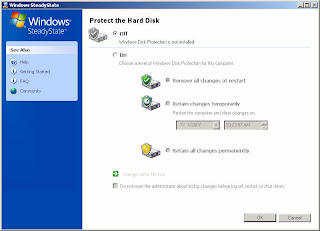
รูปที่ 12. Protecting the Hard Disk
5. Export User Profile
การใช้งานขั้นตอนที่ห้าคือการทำการ Export User Profile โดยมีวิธีการสร้างดังนี้
1. จากหน้าต่าง รูปที่ 1 Windows SteadyState ให้คลิกที่ Export User Profile
2. ในหน้า Export User ให้เลือก User ที่ต้องการส่งออก และเลือกโฟลเดอร์ที่จะเก็บไฟล์ที่ส่งออก ดังรูปที่ 13 เสร็จแล้วคลิก Save
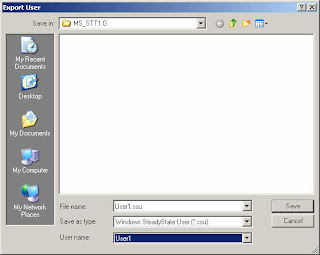
รูปที่ 13. Export User Profile
3. โปรแกรมจะมีข้อความแจ้งว่าได้ทำการส่งออก User profile เสร็จเรียบร้อยแล้ว ดังรูปที่ 14 ให้คลิก OK

รูปที่ 14. Export user profile successfully
มาถึงตอนนี้การคอนฟิก Windows SteadyState เรียบร้อยแล้ว ให้ทำการทดลองใช้งานโดยทำการล็อกออนโดยใช้ username และ password ที่สร้างในขั้นตอน 1. Create User Account and Configuring User Settings แล้วสังเกตการทำงาน อาจทำการปรับเปลี่ยนคอนฟิกได้ตามความต้องการ
Keywords: Windows SteadyState
© 2007 by dtplertkrai. All Rights Reserved


0 Comment:
Post a Comment