วิธีการเซ็ตอัพการเชื่อมต่อขาเข้า มีขั้นตอนดังต่อไปนี้
1. เปิด Network Connections โดยการคลิก Start คลิก Control Panel
2. ในหน้าต่าง Control Panel คลิก Network and Internet
3. ในหน้าต่าง Network and Internet คลิก Network and Sharing Center
4. ในหน้าต่าง Network and Sharing Center ในส่วนเนวิเกตให้คลิก Manage Network Connections
5. หากไม่เห็นเมนูบาร์ให้กดปุ่ม ALT
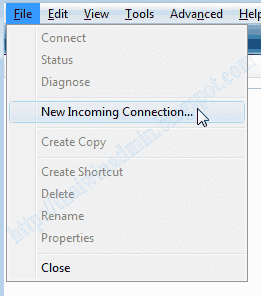
6. คลิกเมนู File บนเมนูบาร์ แล้วคลิก New Incoming Connection

รูปที่ 1 New Incoming Connection
7. ในไดอะล็อกบ็อกซ์ User Account Control ให้คลิก Continue หรือใส่พาสเวิร์ดของ Administrator
8. ในหน้าต่าง Who may connect to this computer? ให้เลือกแอคเคาท์ที่ต้องการจากรายการที่อยู่ภายใต้ User accounts on this computer: ซึ่งสามารถเลือกหลายแอคเคาท์ได้ เสร็จแล้วคลิก Next

รูปที่ 2 Who may connect to this computer
9. ในหน้าต่าง How will people connect? ให้เลือกเช็คบ็อกซ์ Through the Internet เสร็จแล้วคลิก Next

รูปที่ 3 How will people connect
10. ในหน้าต่าง Networking software allow this computer to accept connections from other kinds of computers ให้เลือกเช็คบ็อกซ์ตามความต้องการ เสร็จแล้วคลิก Allow access จากนั้นรอจนการทำงานแล้วเสร็จ โดยในที่นี้เลือกเช็คบ็อกซ์ต่างๆ ดังนี้
- Internet Protocol Version 4 (TCP/IPv4)
- File and Printer Sharing for Microsoft Networks
- QoS Packet Schduler

รูปที่ 4 Networking software allow this computer to accept connections from other kinds of computers
11. ในหน้าต่าง The people you choose can now connect to this computer ในจดชื่อเครื่องคอมพิวเตอร์หรือจะทำการพิมพ์ก็ได้ (โดยคลิก Print this onformation) เสร็จแล้วคลิก Close

รูปที่ 5 The people you choose can now connect to this computer
Incoming Connection
© 2008 Thai Windows Administrator, All Rights Reserved.
No comments:
Post a Comment
เชิญแลกเปลี่ยนความคิดเห็น ขอสงวนสิทธิ์ในการเผยแพร่ข้อความ HTML